Approaching a New Airport
Practical tips help ease your way into an unfamiliar field.
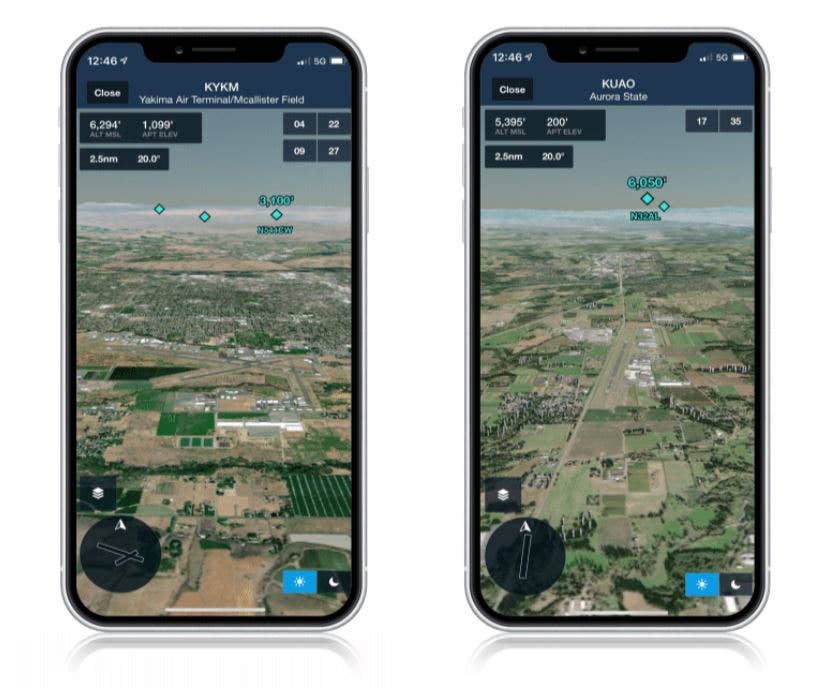
Forming good habits can ensure you enjoy exploring new locations and continue to fly safely. [Courtesy of ForeFlight]
I admit flying into unfamiliar airports has caused me anxiety and confusion in the past. If the proverb is true that “familiarity breeds contempt,” new airports still command all my respect. I guess a big part of this is not knowing what to expect.
Back at my home airport in Daytona Beach, Florida (KDAB), I’d mastered all the visual navigation aids that had come to serve as cues for my flying. For example, to fly the RNAV Runway 16 approach at that airport, a local hospital positioned 5 miles north of the airport was my signal to establish a steady, 500 fpm descent with 10 degrees of flaps—which would take you right in. If you wanted to circle-to-land on Runway 7L, here’s what you’d do: You only had to wait until you were adjacent to the Daytona International Speedway, at which point you could make a turn left and fly towards I-95 south until the nose of your airplane touched the road. With Daytona’s 10,500-foot primary runway now on your left—provided that you leveled off well at your circling altitude—you’d gradually bring the power almost to idle, confirm that your gear and final flaps were down, and you’d be right on the numbers. With the visual cues guiding me along the way, my rehearsal worked every time, whether day or night. Whenever I had to teach that sequence to students, I was like a drill sergeant training recruits how to march in step.
Now, imagine doing that circle-to-land procedure at another airport and—compounding the level of complexity—doing it at night. You might feel the urge to look for similar cues, but it is unlikely you’d get the same results since very few airports are built alike. So, I used to find myself approaching a new airport in the air while under visual flight rules, and instead of being able to focus on the approach phase, I’d end up behind the airplane, figuring out where I was. And it was easy to lose my way if the airport had multiple runways and air traffic controllers issued instructions that required me to report from a particular reference point to be configured for the traffic pattern. Plus, pilots know all too well that the simplified rendering on sectionals and airport diagrams by themselves never completely do the job of allowing you to get up to speed ahead of time.
I know I am not alone here. As an instructor, I’ve seen students at all levels display the same patterns of confusion, regardless of experience. If you’ve recently purchased a new or new-to-you airplane and have set off to explore the world, it will only be a matter of time before you run into this problem. How can you overcome this? Here are some best practices I’ve discovered that quickly orient me to new surroundings and help me get configured for landing in a timely manner.
The rise in satellite imagery available on many commercial products allows you to see photo-quality images of the world as it appears in real life. This tip I discovered when I had to fly into a private airport for a check ride and needed to figure out what visual cues I would use for my traffic pattern. Using Google Earth, I could set up the point of view as if I was at a reasonable altitude and looking forward. Using this perspective, you can see the world as you’d see it from an airplane. I could follow the path I’d expect to fly and learn the surroundings.
To apply this, I suggest positioning yourself 20 nm away from the airport and role-playing what ATC might assign you for headings and altitudes during normal operations. Determine how you would join the pattern for various runways. Think about what you’d need to do if the pattern was full and you needed to turn around without causing a problem for someone in trail. More importantly, figure out where the highest obstacles are. Compare it with your sectional to watch for nearby airspace and establish visual cues to keep you from violating any that you’re not cleared to enter. Consider what you’d do in low-visibility conditions, or at night.
In hindsight, I was surprised it took me so long to use this, but it has proven to be a helpful idea for preflight planning. By talking about how the airplane should be reasonably configured as you fly along and using visual markers as guiding points, you can ensure that by the time you actually make the trip, you know what to expect. It sure beats what I’ve seen other CFIs try to do, e.g.: holding up an airport diagram and spinning it north to figure out where they are. Whenever I’ve shared this Google Earth tip with new students, I’ve seen their eyes light up as they know they now have a workload-relieving tool that improves decision-making and situational awareness. And here’s another tool: You can use ForeFlight’s 3D View after selecting an airport to get a similar bird’s-eye view of your approach to any airport in their database. Pretty slick.
Once you get on the ground, you also need to have a plan. In the past, I’ve let my guard down—just being happy to have safely landed—only to be bombarded with taxi instructions from controllers that sound like a foreign language. Did they say cross this runway and then hold short of the next taxiway, or was it the other way around? Familiarize yourself with the airport diagram beforehand to help mitigate this potential confusion—better yet, a copy of the diagram at your fingertips. Airport taxiways and runways are usually organized in an orderly fashion and have typical flow patterns that pilots at the airport follow. You can also call the tower ahead of time on a mobile phone, or talk to other pilots to figure out those best practices and save yourself some trouble.
In every situation, even with your best efforts, don’t be ashamed to ask for help. However, forming good habits can ensure you enjoy exploring new locations and continue to fly safely.

Sign-up for newsletters & special offers!
Get the latest FLYING stories & special offers delivered directly to your inbox

