Tips and Tricks for Flight Sims
Over the last two years, I have been using many different tweaks and tips found online or invented by myself.
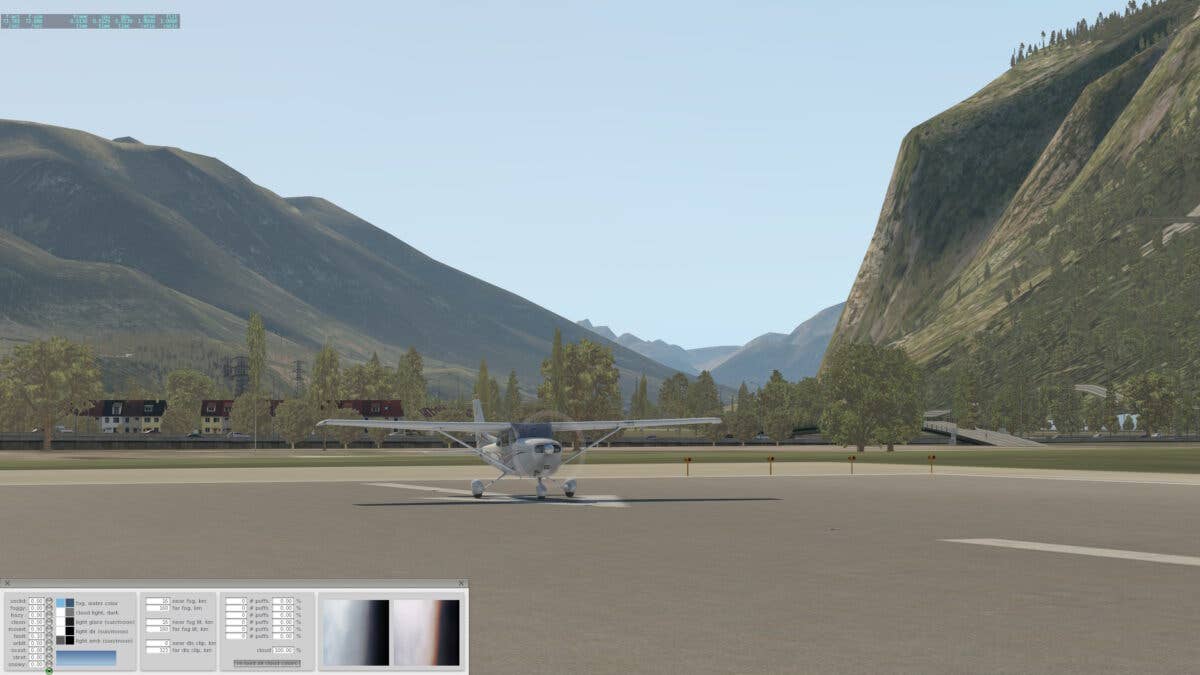
The default X-Plane 11 sky is too dang hazy for my liking on clear days. Yuck. This is on the runway at LOWI in Innsbruck, Austria. [Courtesy: Peter James]
Over the last two years, I have been using many different tweaks and tips found online or invented by myself. Some of them everybody seems to know, so I won’t go into those now. But here at FLYING, I feel most of the real pilots dabbling in the sim world probably don’t know about some simple, effective things that can really help out their experience.
Hazy Skies
Let’s start with my favorite on X-Plane 11 (XP11) that concerns the never-ending “hazy sky” issue that has plagued the sim forever. Now, you can purchase some great weather add-ons that will enhance sky and cloud quality, but I wanted to share a two-second fix that can bring back bluer skies easily.
Even by manually setting the weather and associated visibility sliders to well above the default of 10, XP11 is still too hazy. Just go to the “Developer/Sky Color” tabs and select the bullet for either orbit or hialt to get a rich, blue sky. Done! It will stay that way until you exit and restart. Just note that at sunset you must go back to the bottom bullet point to get back to default. Otherwise the night texturing will get strange, so this tip is a daytime-only feature.
Landing Stutters
Now in Microsoft Flight Simulator 2020 (MSFS2020), I kept noticing a stutter or pause when touching down or about to land. This annoyance was occurring randomly in spots and with any aircraft. I read on some forum that MSFS2020 loads in external “extras” such as tire smoke, skid marks, etc., that can actually stop the sim while loading. This is a painful reality I had thought was gone years ago, but apparently not. I tried out this tip myself and it works like a charm.
First, locate your “Asobo/Base” folder using Windows Internet Explorer. Then find two lines to edit—the “SmokeLanding” small and large effects. From there, simply enter with a mouse click and add something in front of each effect name, such as, in my example below, “off_”.
Next, find your “Legacy/Effects” folder and do the same for three more entries concerning touchdown effects. Name them “OFF_” as shown in the yellow highlight box below.
Once all of this is accomplished, you should not have any more touchdown stutter or pausing. I was astounded by how well this worked for me, even flying various aircraft where it had previously been a problem. One caveat, however, is that on external views you may no longer see smoke, dust, or snow kicked up while landing. If you have a powerful system, you won’t have to use this trick, but for those who have an annoying pause on touchdown, this is well worth sacrificing that visual effect.
Settings to Tweak for General Smoothness
I’m not entirely sure if this is “snake oil”, but I have been running the sim on my laptop in “Developer Mode” for quite some time now. It seems to produce far fewer sudden slowdowns or frame-rate reductions than when I don’t have this option enabled. I am not alone, as many on forums have seen this too. It absolutely doesn’t harm or reduce performance, so why not?
Also, no matter how powerful a system you have, it seems everyone is advising sliding back the “Terrain Level of Detail” and “Objects Level of Detail” sliders to 100. In addition, after somewhat exhausting tweaking comparisons, I have found some performance enhancement by reducing “Buildings, Trees and Grass and Bushes” to “Medium.” They all look just as good as on “Ultra” but knock frame rate down quite a bit in crowded, urban, or perhaps very woodsy backcountry locations. Try it!
You may notice somewhat slightly blurrier panels and CRT fonts on the instrumentation, but things run smoothly and slightly faster than on the max quality “Anti-Aliasing” modes. Asobo really put a lot of work into this mode, and it makes everything run quite blazingly fast on my laptop. A powerful desktop PC can probably just use TXAA at the maximum toggle for absolute clarity and quality.
Simulating Realistic Consequences
I found out that enabling “Crash Damage” and “Aircraft Stress Damage” provide more realistic consequences for poor piloting or ignorance. If you should make a rough, off-airport landing, or actually crash your airplane, it will remain in place, skid, roll off a mountain, etc., in a much better fashion than just receiving an annoying message saying you crashed and instantly forcing a reset of your flying session. This keeps the sim running and is a lot more useful when it comes to visualizing the mess you’ve gotten yourself into. I have made some horrendous mountainside “crash” landings in small bush airplanes, only to have gotten blown upright by the winds near summits, and was able to fly again. With crash enabled, you won't get an unrealistic second chance to fix that kind of mistake.
Controller Options
Assigning common autopilot commands, such as “Hdg Sel,” “Heading Knob,” “Alt,” “VS,” “On/Off”, etc., to an Xbox 360 or Xbox Elite controller is easy. I also have flap handles and gear attached to buttons. This is all in addition to the primary joystick and throttle quadrant I carry with me or the fixed hardware at my house.
Viewing Height
Proper viewing height, “pilot’s-eye view” or pilot’s chair height, is my biggest pet peeve among flight simmers! In order to properly see the world outside, you must readjust the default “far too low” views that the developers have set. I cannot figure out for the life of me why all these sophisticated developers place the default viewing height as if it’s seen from the perspective of a 6-year-old. The fix is very simple, and I have discussed it in previous articles.
You must assign a keyboard key function to “Increase Cockpit View Height,” and “Decrease Cockpit View Height” in the “Cockpit Camera” section. I like “[RIGHT SHIFT] + [UP]” and “[RIGHT SHIFT] + [DOWN].” Just like in any real aircraft, a proper seat height that allows you to see over the panel and down to the runway is the best for flaring. Unfortunately, in a flight sim we don’t get the full 3D effect, so we must compromise a bit by fiddling with the viewpoint before locking it into a memorized viewpoint you can refer to instantly via a keyboard or controller button. I usually base it all on being able to see a small portion of the VSI unit to aid in takeoff and landing. This pretty much lines up with my real eyeballs.
I hope you’ll find these tips and tricks handy and helpful. As always, no flight is complete without using a great set of controls. I would recommend the folks at Sporty’s Pilot Shop, with my first choice being the “flight sim starter set” featuring HoneyComb hardware.
Also, check out my beginner's guide on setting up your simulator for the first time.
Sign-up for newsletters & special offers!
Get the latest FLYING stories & special offers delivered directly to your inbox

